EQ (equalization) is one of the most important tools at your disposal as an audio engineer. In its most basic form it is a tone control, used to change the frequency balance of a signal. Most of us have encounter EQ on our car and home stereo systems with the treble and bass control knobs or a set of hi, mid, and low tone controls. These types of controls are adequate for rudimentary adjustments, and are usually used in such a way, however, they only provide two or three controls for the whole entire frequency spectrum, so each control adjusts a fairly wide range of frequencies.
Advanced equalization systems provide a fine level of frequency control. When using EQ you want the ability to adjust a narrow range of frequencies without affecting neighboring frequencies.
Whether your recording or running sound for a live event, there are 4 main types of EQ to use: Shelf, Bell, Graphic, and Parametric. (Ok, actually there are 5 if you include the use of a filter, which comes on most any mixing console.) In part 2 of this blog I would like to give 5 Tips for Using EQ, but now lets take a look at these common types of EQ.

FILTER EQ
As can be seen in the image right, a filter cuts out the frequencies above or below its cut-off point. Low-pass filters will only let low frequencies through, cutting out the highs; whereas a High-pass filter will do just the opposite. These tools are useful when unwanted frequencies at the high or low end are present. For example, if a mic was picking up stage rumble (at the low end spectrum) then use a High-pass filter. When micing a kick drum or bass guitar, use a Low-pass filter.

SHELF EQ
In shelving equalization, all frequencies above or below a certain point are boosted or cut the same amount, creating a “shelf” in the frequency spectrum. In a way, shelf EQ works like the High and Low-pass filters, except you are in control of the frequencies selected and you can apply a gentle roll off as opposed to a heavy cut from a filter.

BELL EQ
If you want to affect a frequency band at each end of the frequency spectrum, then a Bell Curve is needed. This type of equalization allows you to selectively boost or cut a limited band of the audio spectrum. There is usually one knob that selects the cut off point (the central point of where your want to boost or cut a frequency), and another knob that sets the dB level of the boost or cut. The dB level is affected the most at the cut off point and then frequencies further away are affected less.

GRAPHICAL EQ
As the name implies, a Graphical Equalizer uses a graphical layout to represent the changes applied to certain frequencies. Graphic EQ’s are commonly referred to by the number of frequency bands they have (e.g. 51-band, 31-band). Each band corresponds with a set of sliders and you raise or lower each slider to boost or cut the level of that frequency. Typically, the more sliders you have the more control you have. (Above is a DBX 31 Band Graphic Equalizer)
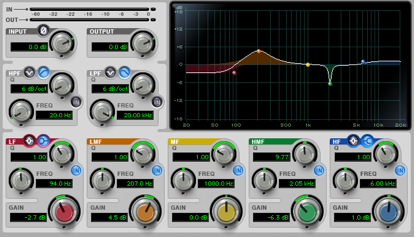
PARAMETRIC EQ
The word parametric means something that has one or more parameters on which the outcome depends. The parameters used in parametric audio equalization are centre frequency, bandwidth, and amplitude. Like a Graphic EQ, a Parametric EQ gives you more accuracy and flexibility, especially in audio recording. In most DAWs (Digital Audio Workstations) today Parametric EQ is a must have tool for mixing audio. Shown above is a Parametric EQ plug-in for Pro Tools HD.
For more info on EQ check out: A Guide to Equalization
No comments:
Post a Comment